As an aphid taxonomist, I am often contacted by people who want to sample aphids in crops or experimental fields using yellow pan traps. I know from the gradually deepening depression of those people as we talk through the complexities that they were thinking such trapping is easy and well-understood. Below I present two separate essays. The first deals with what can be learned and said about yellow pan trapping data. This essay also covers some other sampling methods and brief discussions of pros and cons of all, finishing with some relatively concrete recommendations. The second essay gives specific instructions on setting up and using yellow pan traps for those who are determined to use this method. I hope to some day write a third essay about the taxonomic challenges associated with evaluating aphid trap samples.
What can we say about the meaning of aphid captures using yellow pan traps?
Andrew Jensen, Olathe, Colorado
January 2025
Below are some of my thoughts about using yellow pan traps (and a little about other trapping methods) to sample aphids moving through a landscape. I leave aside the problems of aphid taxonomy in trapping programs, a big subject worthy of its own essay at some point in the future.
Purposes of Yellow Pan Trapping
Trapping aphids using yellow pans or buckets full of water has been practiced for many decades to monitor flights of aphids in agricultural settings. It is often the case that aphids as crop pests are most damaging in their roles as virus vectors. Yellow pan traps are therefore used to monitor the influx of alate aphids in spring or early summer, and sometimes the exodus of winged aphids from farm fields in the late summer and fall. Such traps are also sometimes used to measure movement of aphids across a landscape. By understanding when aphids arrive in a crop field, it is thought that growers and their consultants can better plan management strategies such as applications of pesticides or biocontrol agents, or time harvest dates that minimize development of damage from aphids or viruses.
I recall being told by my graduate school co-major professor, Jack Lattin, that one of our key historical aphid taxonomists, D. Hille Ris Lambers, supported the Dutch potato industry by evaluating yellow pan trap samples for virus vectors such as green peach aphid. This was especially poignant for me as a student because yellow pan traps are what got me going in aphid taxonomy and biology.
The Whole Idea: attraction to yellow
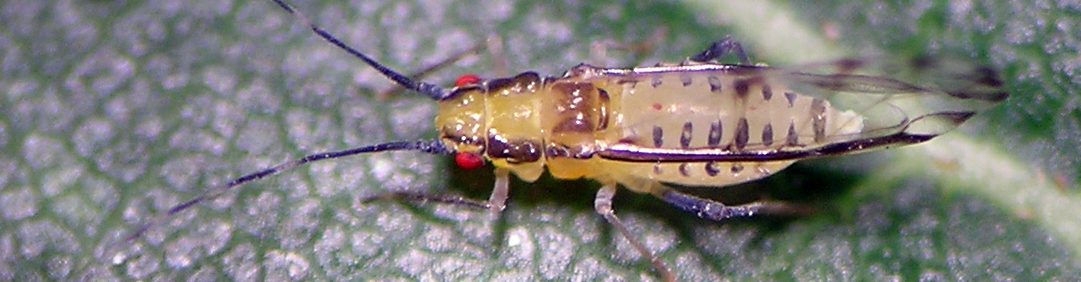
Yellow pan trapping relies on the fact that many aphids, and plenty of other insects, are attracted to yellow. Aphids have relatively little control over their flight paths, mostly staying aloft and allowing the wind to take them where it will. Aphids can, however, steer themselves in the air column toward attractive things like potential host plants and yellow things. Yellow pan traps catch aphids who steer themselves toward yellow and get caught on the water surface. Many aphids that alight on the water are then subsumed into the water to be collected by the human being who manages the trap, then sent to the hapless taxonomist who, in a moment of weakness, had agreed to look through the samples. See Figure 1 for an example yellow pan trap sample. Alas, water pan traps catch many insects other than aphids, and after a week in the field the water can be a broth of decomposing bees, flies, wasps, and every little insect that happens to be attracted to yellow or needed a drink of water. As described in the methodology section below, there are various approaches to separating the water and goo from the aphids.

Strengths
The reasons to use yellow pan traps to monitor aphid flights include:
- Taking advantage of the attraction to yellow allows a passive and very simple trap that can be serviced as little as weekly.
- Similarly, using water as the trapping medium avoids use of glue (on yellow sticky traps) or various chemicals such as propylene glycol, which are expensive and messy.
- Aphids preserved in water for a few days (up to a week in good weather conditions) usually are in acceptable physical condition for identification.
- It is possible to detect early flights and/or low populations of aphid species that are especially attracted to the yellow of your trap (not all yellows are the same, obviously, which could be important in trapping). For example, the dandelion (Taraxacum) specialist Uroleucon (Uromelan) taraxaci seems to be very attracted to the yellow buckets I have used. It appears in low numbers in most places I’ve trapped but it is very difficult to find on its host plants (where it lives on the crowns and similar below-ground parts). In other words, a very uncommon aphid like this can easily be detected in the landscape using yellow pan traps. Quite probably other species fit this pattern as well.
- When consistently deployed and managed year after year, yellow pan trap data can be informative and help to understand outbreaks of aphid-transmitted viruses in crops.
- Researchers, crop consultants, and growers can feel like they are doing something valuable that informs pest management decisions.
Weaknesses
Many researchers and others who deploy yellow pan traps believe that they measure relative abundance of all aphid species flying through the area, and that they are simple and easy to deploy and manage. Unfortunately, there are several shortcomings and qualifications that I think must be considered.
- Observation in the field leads me to conclude that not all aphid species are equally likely to be caught by these traps. Reasons for this may be that some species are:
- not, or only slightly, attracted to yellow;
- extremely attracted to yellow, resulting in bias in the data;
- better at escaping the water’s surface tension;
- better at avoiding landing on water.
- Badly preserved aphids, whether due to luck, poor management, bad weather, or acts of the gods, limit what can be learned from samples.
- Set up and use of traps is not as simple as might be thought:
- It is well-known that color, and probably texture, of the substrate on which the trap is placed affect catch. This can be shown using painted backgrounds such as sheets of plywood. I did such work as an undergraduate (1980s) and we found definite differences by background. Alas, I don’t have those data to share with you.
- When the trap is initially deployed, it will be nearly full of water. But, as the days progress, the water level will vary according to losses caused by evaporation and thirsty animals, and gains from rainfall or irrigation. This variation almost certainly causes variation in trap results.
- Assuming that my cleaning instructions below are followed, the bucket will be a resplendent yellow at the beginning of each trap period (e.g., a week), but will gradually become dirty both inside and out, almost certainly affecting the catch.
- Plants near a trap can drastically bias sampling. For example, I serviced traps many years ago that were next to stands of black locust (Robinia pseudoacaccia) that were heavily infested with Appendiseta robiniae. These traps were sometimes inundated with scores of A. robiniae, which would rarely be caught in other traps not placed near locust trees.
Examples of problems with yellow pan trapping
Since owning my first house in the countryside back in 2000 I have periodically trapped aphids in my yards using yellow bucket traps. These samples are interesting and can be a good way to secure alate viviparae of species of interest, get an idea of species flying through my yard or field, etc. The problem highlighted by my own trapping efforts is the one discussed above: not all aphids are equally attracted to yellow. A key time to observe this phenomenon is the fall when many alate aphids are migrating from secondary back to primary hosts. Then it is easy during calm evenings to catch aphids in flight using a sweep net or similar and compare those catches to what appears in yellow bucket traps. My experience shows that species composition between the two methods can be drastically different.
An example from large scale agriculture was the aphid trapping network serving the potato industry in Washington State. Back in the days when potato leafroll virus (PLRV) was common, the Washington State Potato Commission funded a yellow pan trap network that aimed to detect the first flights of green peach aphids (Myzus persicae) into potato production areas. It was thought that yellow traps were sufficiently attractive to this aphid that they would detect flights early, allowing prompt treatment with insecticides that would limit damage caused by the virus. It was eventually determined, however, that fields were often colonized by M. persicae, with abundant reproduction and development of apterous populations, before they were detected in yellow pan traps. Hence the traps were not serving their purpose. Subsequently the Commission changed the aphid trapping effort to one that samples the foliage directly rather than relying on traps.
Alternatives to pan trapping
I can think of four main alternative methods for sampling aphids flying through the landscape. I present these below with brief thoughts on pros and cons.
- Suction traps: these are usually made of a large-diameter PVC pipe set vertically with a motorized fan at the bottom that creates suction from the top of the pipe into a collection vessel at the bottom. Because aphids are such weak flyers, a relatively low flow of air down the pipe is adequate to capture aphids that accidentally fly over the top of the pipe. These traps vary in height according to the preferences of the users, who may be targeting relatively local aphid flights with short traps (e.g., 2 meters) or relatively long-distance flights with tall traps (e.g., 5 meters).
Pros:
- Suction traps result in excellent samples for identification because the preservation fluid in the trap is usually a preservative such as alcohol or propylene glycol rather than water.
- In my experience these traps catch a wider selection of aphid species than do yellow pan traps.
Cons:
- These traps require skill to manufacture and maintain, including their moving parts, motors, etc. They must also be secured to avoid damage from high winds.
- Suction traps catch aphids but could obviously be biased in a similar way to yellow pan traps. For example, they may over-sample aphids that are attracted to tall upright poles. Or, they might under-sample aphids that avoid such poles. Another likely bias is habits of flight elevation. Do some aphids fly higher than others? Does flight height vary by time of year or weather conditions? And so on.
- In any given landscape or geographic area, it will be very hard to know what trap height is best suited to the objectives of the trapping program. In recent years some programs have favored a 2-meter trap with the idea that they sample more local flights. But, can we be certain this is always true for each aphid species, landscape, geography, time of year, etc.? I doubt it.
2. Sticky traps: Yellow sticky traps are often used to detect small flying insects both indoors and out. For example, I used them for several years to sample populations of beet leafhopper adjacent to commercial potato fields in Washington State (see my trapping guide here). Others use them to detect thrips or whiteflies in greenhouses. There have even been attempts to mass-trap insects using yellow sticky tapes, drums, etc. with the aim of reducing populations to non-damaging levels.
Pros:
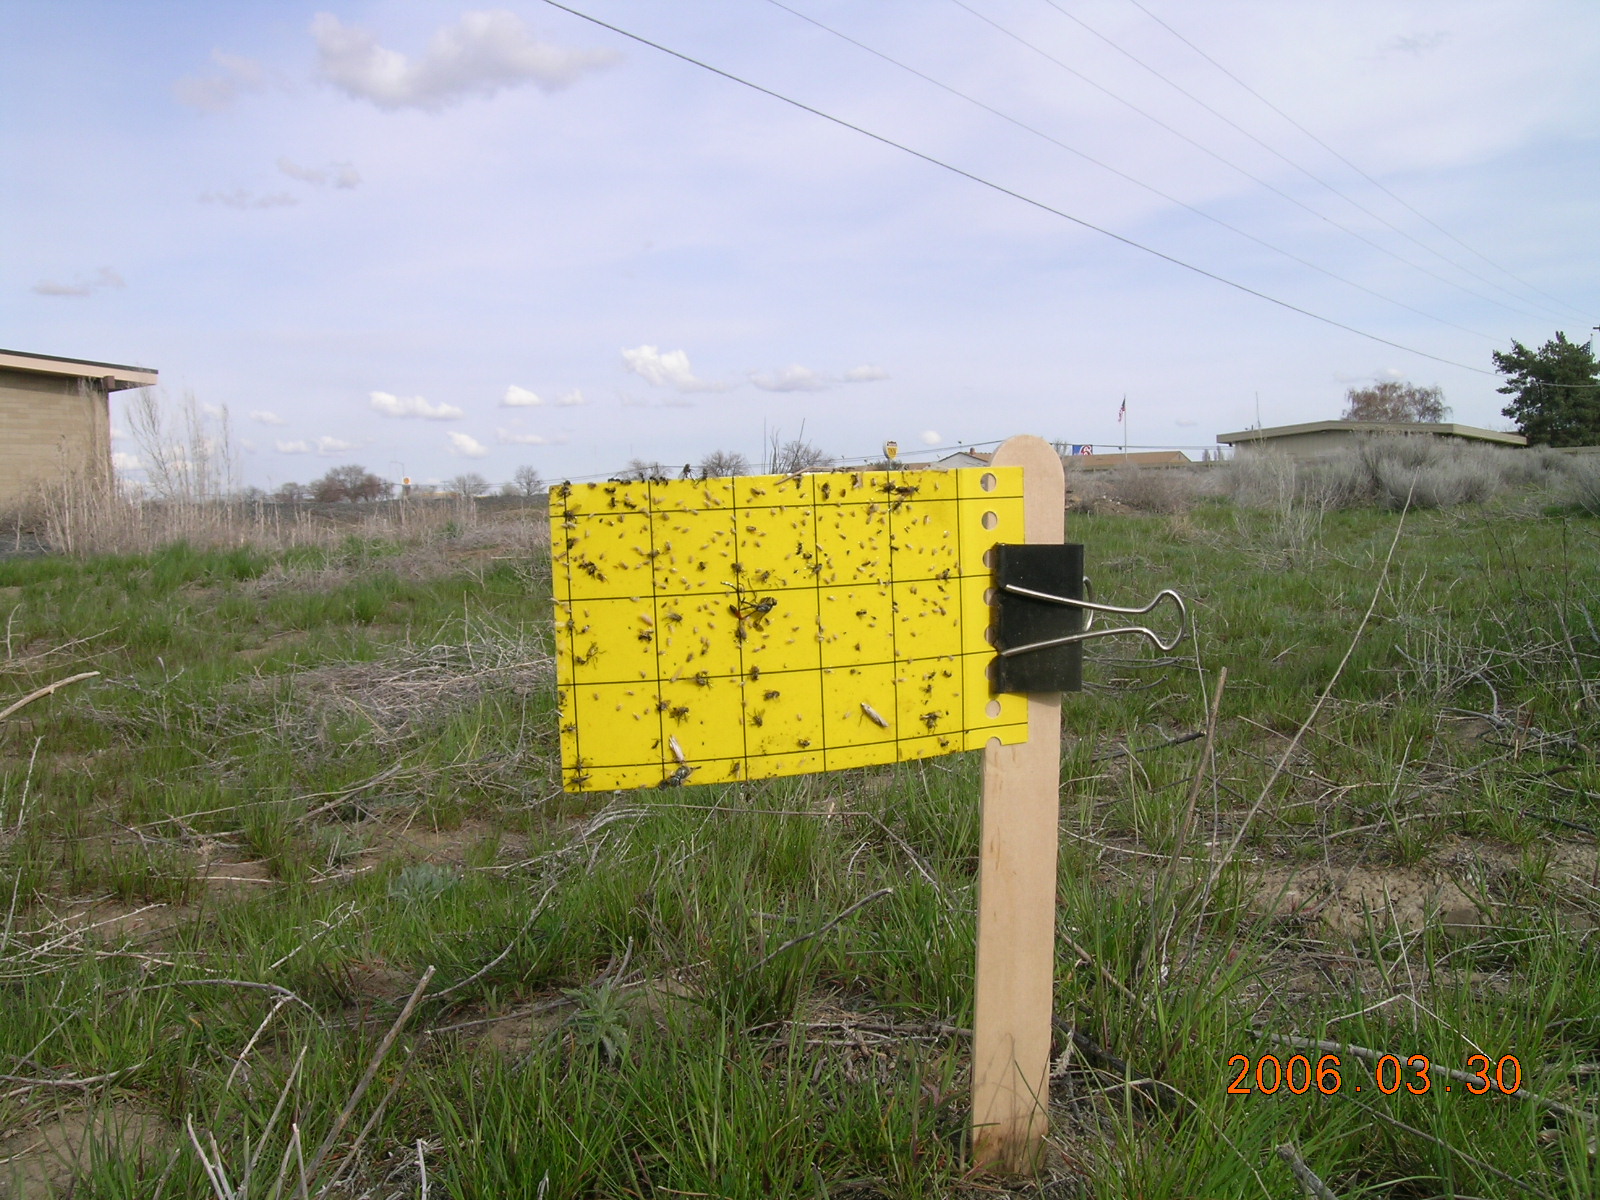
- Sticky traps are incredibly easy to set up and retrieve. One merely removes the protective paper backing, then mounts the trap on a stick or post in an appropriate site (Figure 2). They require no water, vials, ethanol, or other preservative, etc.
- It takes almost no specialized knowledge to maintain a sticky trapping network – the technician needn’t know anything about insects. The only entomology expert required is the one who looks at the trapped insects and tabulates those of interest.
Cons:
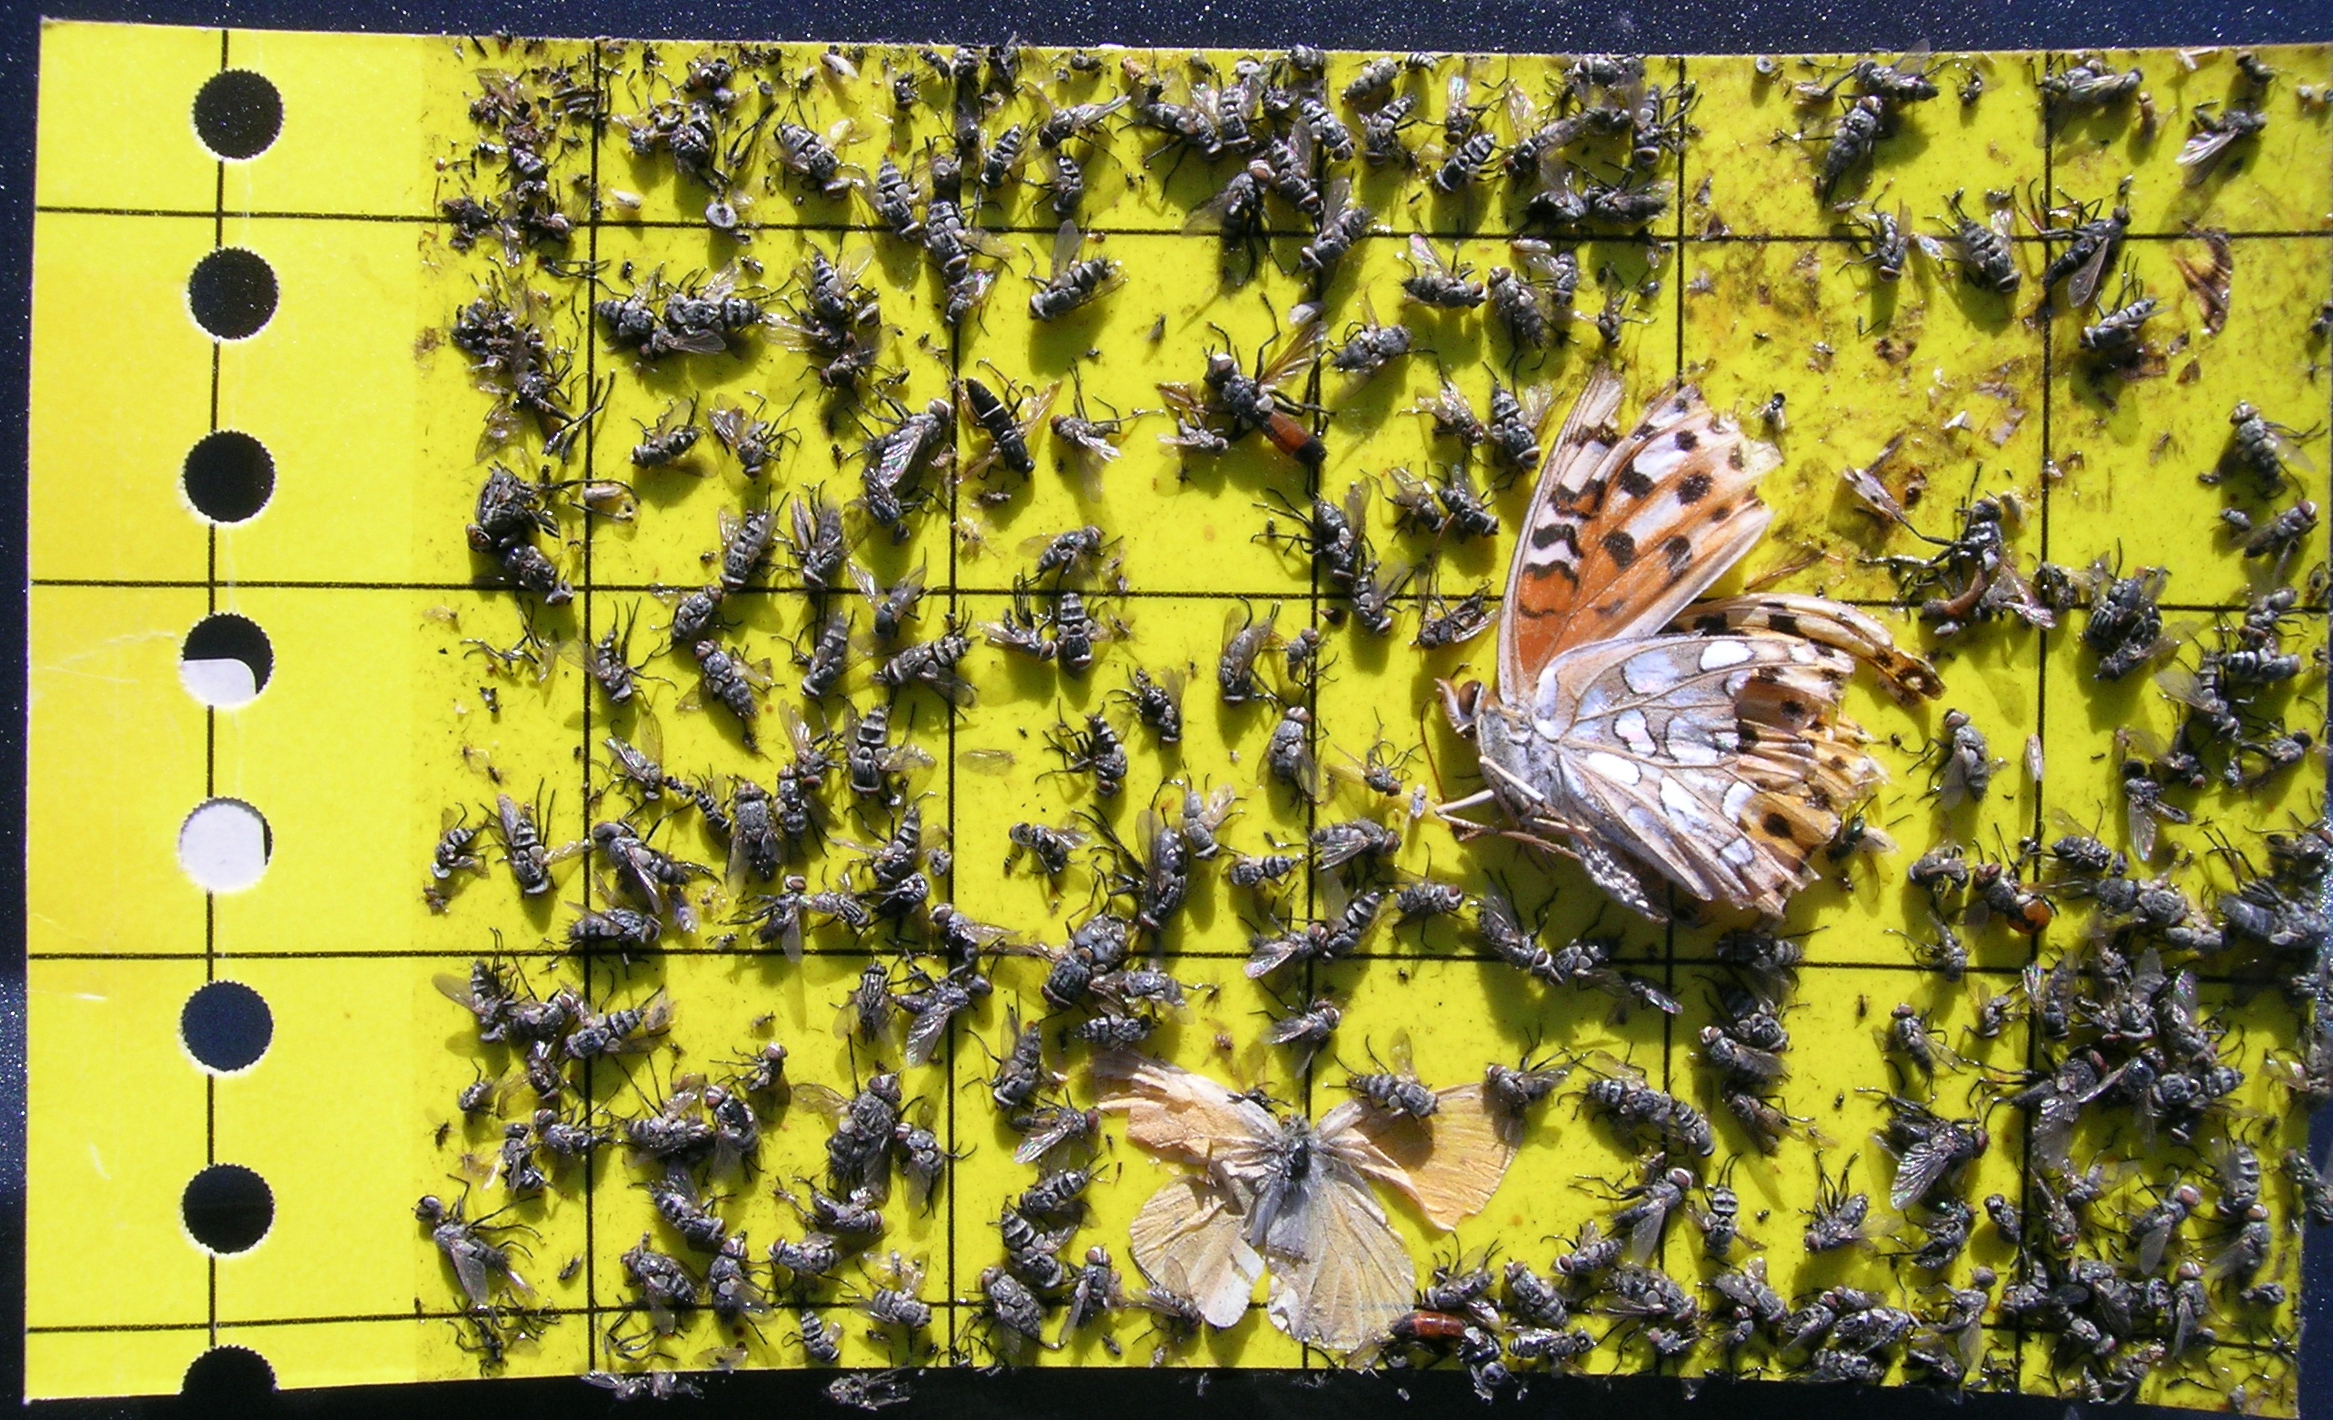
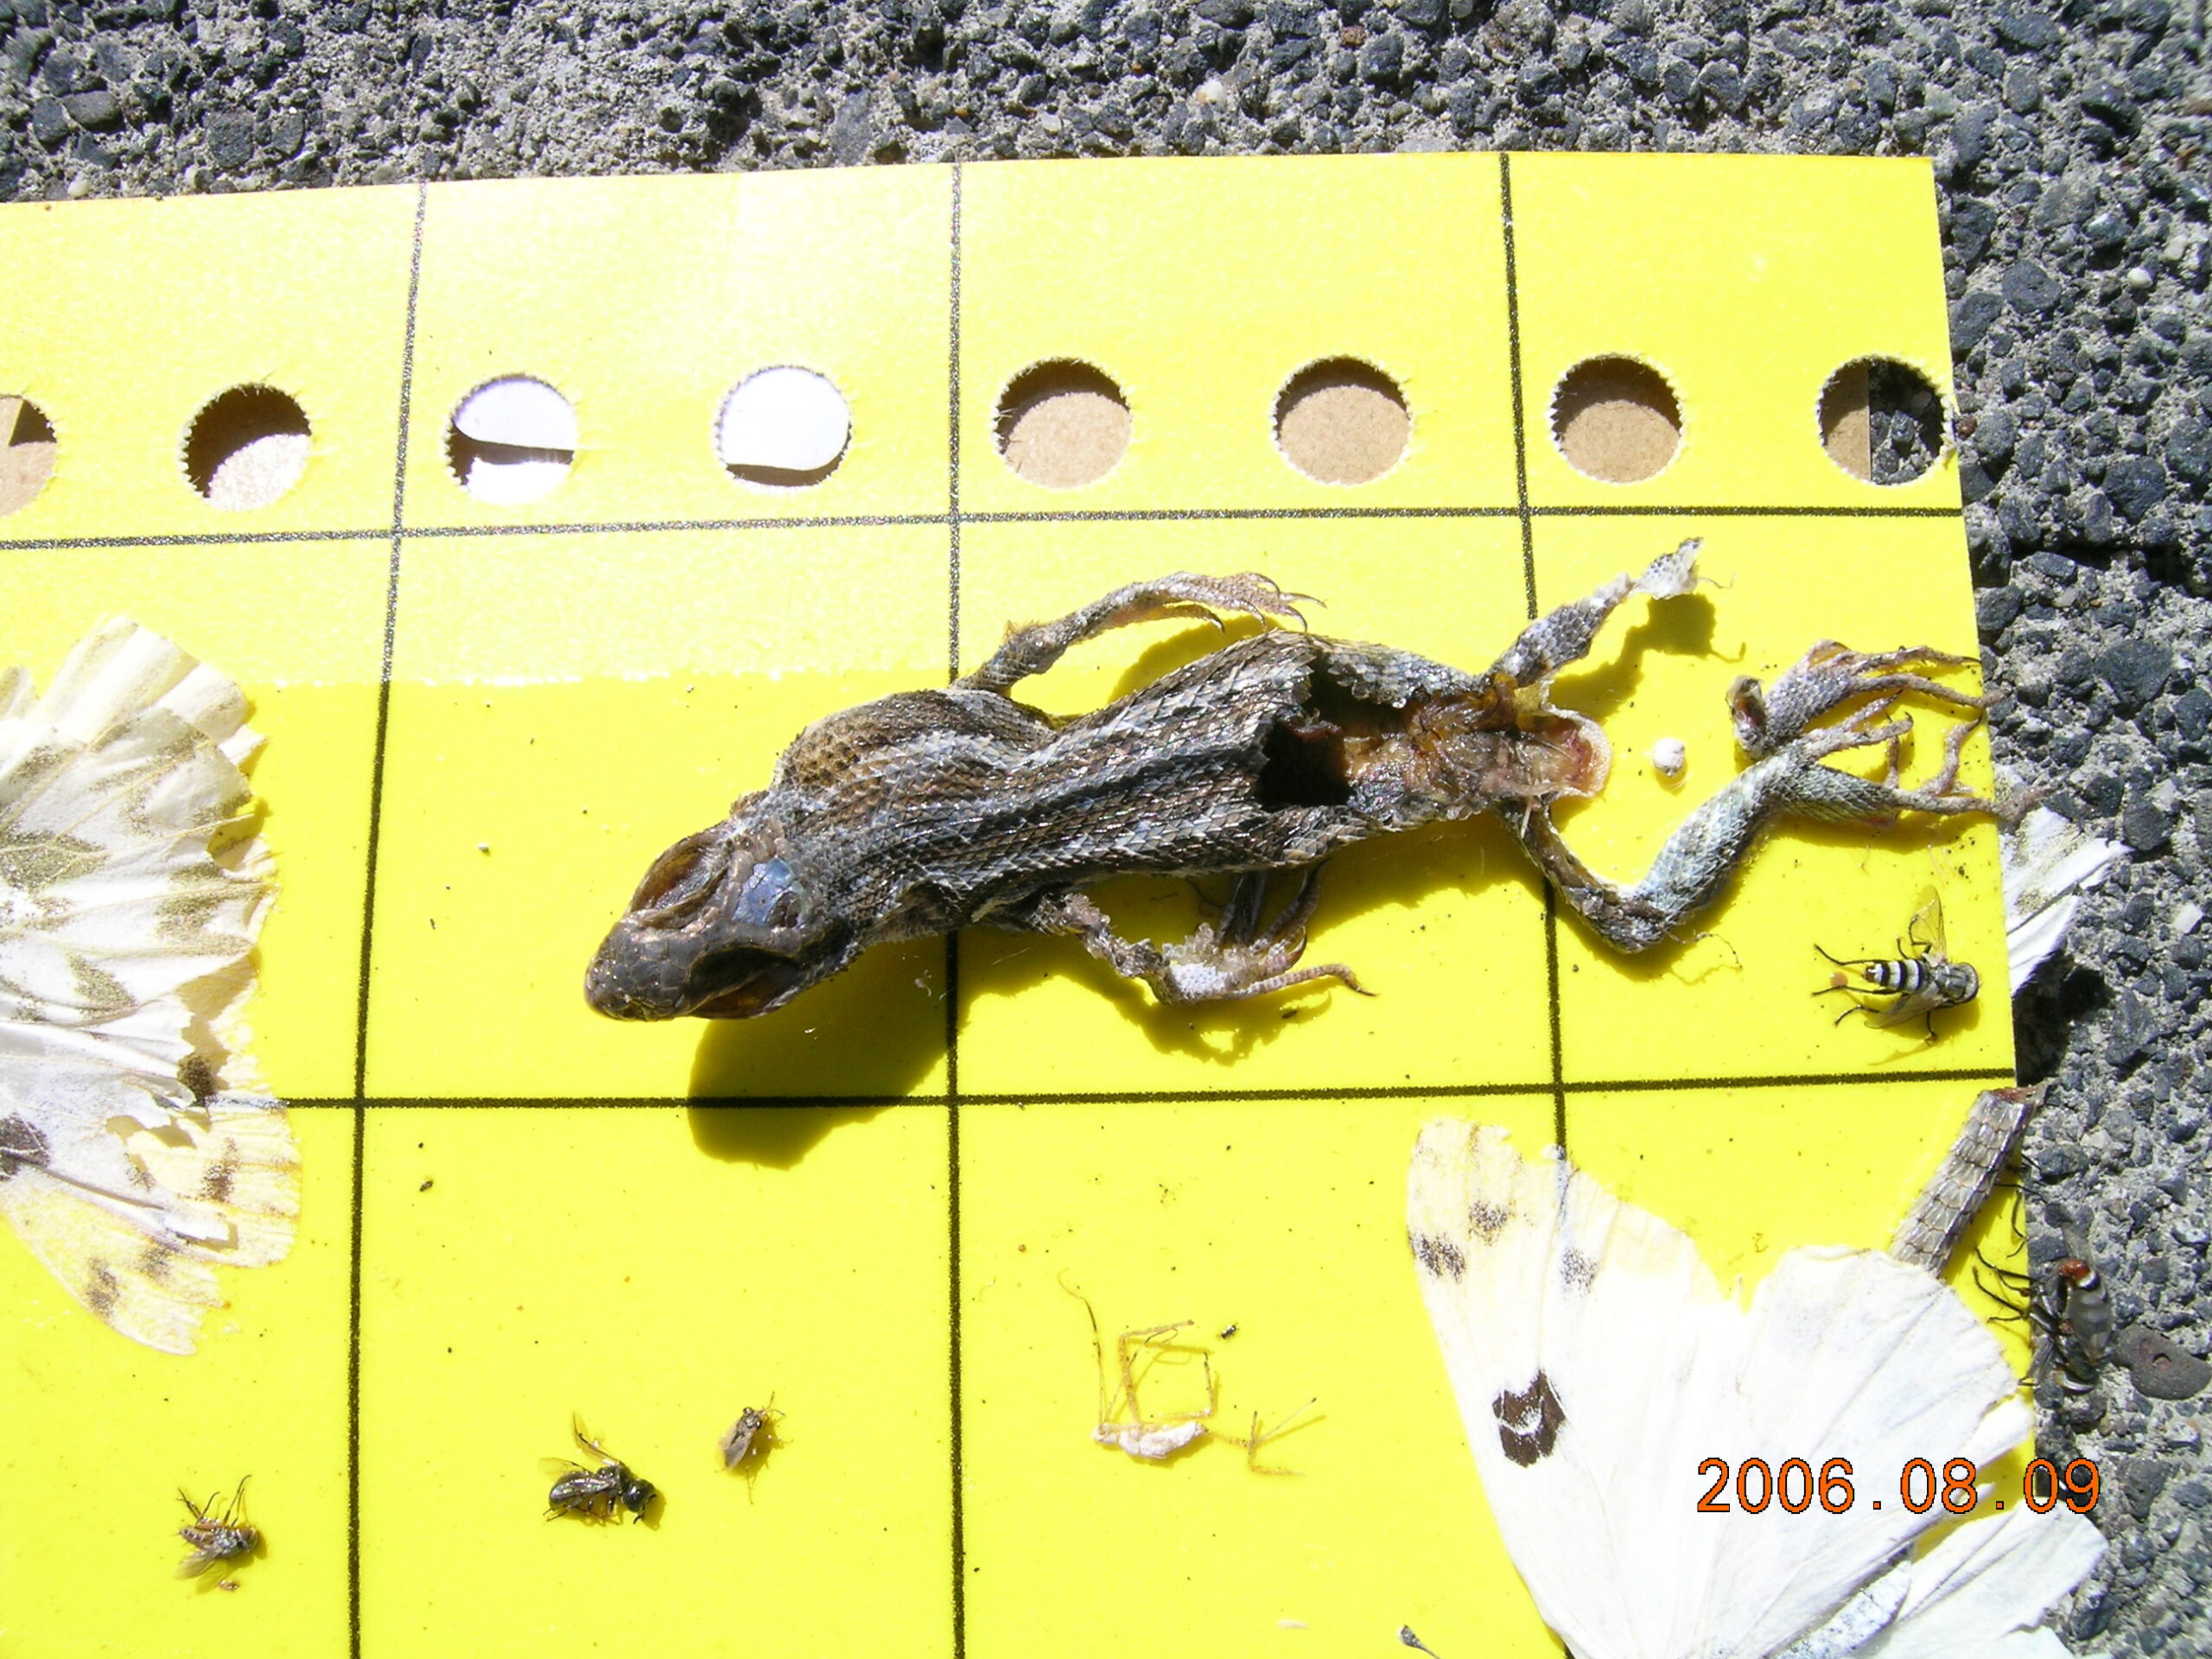
- Sticky traps are very indiscriminate in what insects they catch (Figure 3). They are often completely covered in bees, large flies, butterflies, and other large insects. They even catch birds, lizards (Figure 4), and rodents. This phenomenon is bad for all those accidentally caught animals, plus such sullied traps are hard to evaluate for the target insect.
- As with yellow pan traps, these traps rely on aphids’ attraction to yellow, and as noted above, it is clear to me that not all aphids are equally, or even at all, attracted to yellow. This is obviously an important bias to consider.
- Aphids are soft-bodied, meaning that after death they dry up and shrivel. Many other insects are called hard-bodied, meaning that they retain their shape as they dry up after death. Shriveled aphids are nearly impossible to identify. To avoid shriveling, sticky traps must be changed every 2 or 3 days.
- Besides the shriveling issue, sticky trap effectiveness and quality usually drop drastically each day that they are deployed in the field. This is due to damage from rain or irrigation, becoming covered in non-target animals, becoming coated in blowing dust, or being completely stripped of insects by hungry birds. Therefore, it is best to retrieve traps twice a week, increasing costs and time commitments.
- Some manufacturers use very thick, almost runny glue on their traps, which can completely engulf small insects like aphids, rendering them almost impossible to identify or to remove from the trap for any evaluations or testing. Fortunately, there are commercially available traps that are very sticky but have only a thin layer of glue.
Green tile traps: This is a method developed in the 1990s, if I recall correctly, which aims to capture aphids as they are attempting to alight on a crop. The trap is composed of a small dish or container suspended in some kind of rack above the crop canopy. In the dish is a tile of the same color as the crop along with a trapping fluid such as water or propylene glycol. I read the first papers describing this method with great interest and optimism for a useful tool in understanding aphid-transmitted viruses in crops. The method may in fact be very useful when done well by skilled personnel, with the right equipment, and in the right conditions.
Pros:
- These traps theoretically capture only aphids that intend to alight on the crop, intercepting them as they fall toward the foliage. In other words, they do not rely on any attraction between aphid and trap, possibly limiting biases like those mentioned above for yellow traps.
- Assuming the trapping vessels contain a preservative rather than water, the resulting samples can be very high quality.
- Because there is no attraction in the trap, unintended captures of large insects and vertebrates is minimal.
Cons:
- While the original papers on this method made it sound easy to use, I had a different experience. I tried to use this method to help a potato farmer in Washington State ascertain his aphid and thrips pressure. I had trouble making this method work using modified tomato cages as racks, with translucent plastic containers as vessels, and water as trapping medium. My traps caught practically nothing, reasons not being entirely clear. Some problems I experienced and anticipated follow.
- Strong wind, a common feature in the agricultural areas I have worked, can complicate trap setup due to the need for very sturdy racks to hold the vessels.
- Rain, and especially irrigation water, can complicate this method. The trapping vessels should be shallow containers to more effectively trap insects. This shallowness means added water can cause traps to overflow. In areas such as the Columbia Basin of the Northwest U.S. where crops are irrigated almost daily, this input of water can be a deal-breaker.
- A related problem if water is used as a trapping medium, as I tried, is evaporation. In the heat and low humidity of an inland Northwest summer day, a trap can easily lose a centimeter or more of water. So even if water input from irrigation can be avoided (e.g., by sampling in drip-irrigated crops), evaporation is likely to wreak havoc, quite possibly requiring nearly daily maintenance.
Direct foliage sampling: As mentioned above, this is a method that has been used and proven interesting and useful to potato growers in Washington State. The idea is to send sampling crews to fields or research plots on a regular basis to sample insects on crop foliage using a sweeping or beating tray/sheet technique.
Pros:
- If sampling begins well before aphid flights are expected to begin, this method can detect the earliest migrations of aphids into a crop of interest.
- Because it is not relying on any color attraction, this method only records aphids that have in fact alighted on the crop.
- Samples gathered this way are in excellent condition for identification and other analyses.
Cons:
- Direct foliage sampling obviously requires substantial labor. Each sampling period requires staff to visit a site and spend a fair bit of time sampling foliage, especially if samples are meant to be representative and unbiased in terms of cardinal direction, proximity to field edge, etc.
- Sampling staff must be able to recognize aphids among captured insects, and to do so quickly before they escape by running or flying. Also, if there is interest in all aphids that alight and spend time on the crop foliage, all winged aphids should be captured and preserved for identification.
- As usual there are biases that affect this method. For example, wind can affect sampling by blowing away insects on the beating tray/sheet. Wind might also cause insects to move deeper into the crop canopy, reducing numbers detected. Time of day is another likely problem: aphids fly mostly during periods of mild wind, which often means early morning and evening. So, when the project aims to detect all aphid species alighting on a crop, whether they are colonists or not (e.g., when working on a nonpersistent virus system), sampling during or slightly after periods of likely aphid flight is important. For example, if a single sampler services an entire research trial or commercial field sampling scheme, they may be at it for several hours, creating a timing bias.
What can we say, therefore, about aphid trapping data?
The bottom line is that when we trap aphids using yellow pan traps, we are sampling the aphids that are caught by yellow pan traps in that time and place. We are not sampling all aphid species flying past our traps, and our sampling is biased.
So, I think it very important that researchers, extension personnel, crop consultants, and growers understand the nuances. Can we say we are monitoring the flight of all aphid species moving through the environment? No. Can we say we are detecting the early flights of pest species? Probably not. Can we claim that our results show the presence or absence of any given species when we know nothing of its propensity to be caught in yellow pan traps? No.
When reporting on such data I think we should be careful to say what we did: we sampled the aphids that were attracted to and caught in yellow pan traps. Ideally, we would openly acknowledge the weaknesses in the method and acknowledge that it likely misses some species almost entirely and catch of commonly caught aphids may vary based on seasonal behavior of flying aphids or other vagaries.
What do I recommend? Combined methods
Some of you might be wondering, then, what does this curmudgeonly party-pooper Jensen recommend, anyway? I have some thoughts, as you might guess.
- Some aphid species seem to be reliably sampled using yellow pan traps, and consistent, standard application of good trap management practices could be sufficient, or nearly so, for monitoring their movement. Examples from my experience include: Acyrthosiphon lactucae, Acyrthosiphon pisum, Brevicoryne brassicae, Hayhurstia atriplicis, Lipaphis pseudobrassicae, certain Aphis species such as Aphis spiraecola, aphids highly attracted to yellow such as Uroleucon (Uromelan) taraxaci, etc. If your program will be targeting a set of known species (i.e., one or more), I recommend doing some test trapping in appropriate habitats for one or two full seasons to confirm that your trapping method will work for its intended purpose. Such confirmatory work can be enhanced by sampling on local host plants of your target species. If they can be easily found and your trap catches seem to match the population trends you see on their hosts, then perhaps you can rely on yellow pan traps for monitoring them.
- If your goal is to gather as much information as possible about movement of all aphid species through an area, then I recommend combining methods. A thorough method would be yellow pan trapping, suction trapping (possibly at two heights), and direct foliage sampling. Comparing and contrasting data from these methods may point you to a simpler approach that gets what you want. Or, you may simply like the deluge of information these combined methods provide. Also, combining methods can point to interesting phenomena that you would not expect. For example, when I was a graduate student managing insect sampling in large potato field trials, we conducted both yellow pan trapping and beating sheet samples in the foliage of all plots (they were large plots). We did the foliage sampling very early in the morning using numerous teams of young people well-trained in the target insects. Winged aphids were all collected directly into preservative from the beating sheet samples. An interesting trend I remember seeing was that Diuraphis noxia (‘Russian wheat aphid’) was one of the most commonly caught alate aphids in the foliage of our potato fields. In traps it was present but not a dominant species. We never studied the situation well enough to learn whether this phenomenon was relevant to the viruses we were studying, but imagine that it was? We’d never have known about it had we not been collecting and identifying the aphids in our beating sheet samples.
- As any trapping network or experimental field is being planned and laid out, I highly recommend taking notes about the plant communities and crops near each sampling site. That way you may better explain otherwise unexpected disparities between and among sites. For example, if one of your 20 sampled fields is next to an alfalfa field, and your trap is catching far more pea aphids than your other sites, you have the likely explanation, i.e., the pea aphids are coming from the next-door alfalfa. Or like me, if one of your traps is inundated with a tree-feeding aphid, knowing that a sampling site is surrounded by that kind of tree would be helpful. Or, as we often see in the western U.S., if a site is catching exorbitant numbers of Acyrthosiphon lactucae, it would be good to know whether it is surrounded by unmanaged populations of Lactuca serriola (prickly lettuce).
If you want to chat further about any of these issues, please feel free to reach out.
Yellow Pan Trap Methods
Andrew Jensen, Olathe, Colorado
One of the things I did a lot of in my college and graduate school years was aphid trapping with what are commonly called yellow pan traps, but are also known as Moericke pan traps. Basically, such a trap can be any bright yellow vessel that holds water and has a wide opening on top. The yellow color attracts flying aphids, who then mistakenly alight on the water and get trapped in it. The aphidologist comes by periodically to collect the aphids from the water, perform basic trap maintenance, and to refill the water. Trapping aphids in this way is useful to monitor when each species in the area is migrating between hosts, when crop aphids are immigrating or emigrating, etc. Yellow traps are also useful to natural historians, like me, for detecting rare or hard-to-find species in the environment.
In all the yellow pan trapping I did, I developed some strong opinions about how they should be managed, samples collected, etc. In this article, I’ll cover some of those details.
- The Vessel. As noted, almost any water-holding vessel can be used, either inherently yellow, or painted yellow. Some folks use small picnic bowls, or even yellow-coated petri dishes. However, in all the places I’ve lived, very small containers like these will not work due to one or both of these factors: dry weather and irrigation. Obviously, in order for the water to trap the aphids, there needs to be water in the trap. In the arid climates of the western U.S., even a single day of hot summer weather is enough to dry up a picnic bowl of water. Similarly, if rain or irrigation is expected to hit the trap, it must have enough capacity and be carefully managed so that it does not overflow. In contrast, some folks use 5-gallon buckets. I discourage this practice as well, for a few related reasons. First, 5 gallons (~19 liters) is a lot of water to have to carry or convey to the trap each week for refilling.
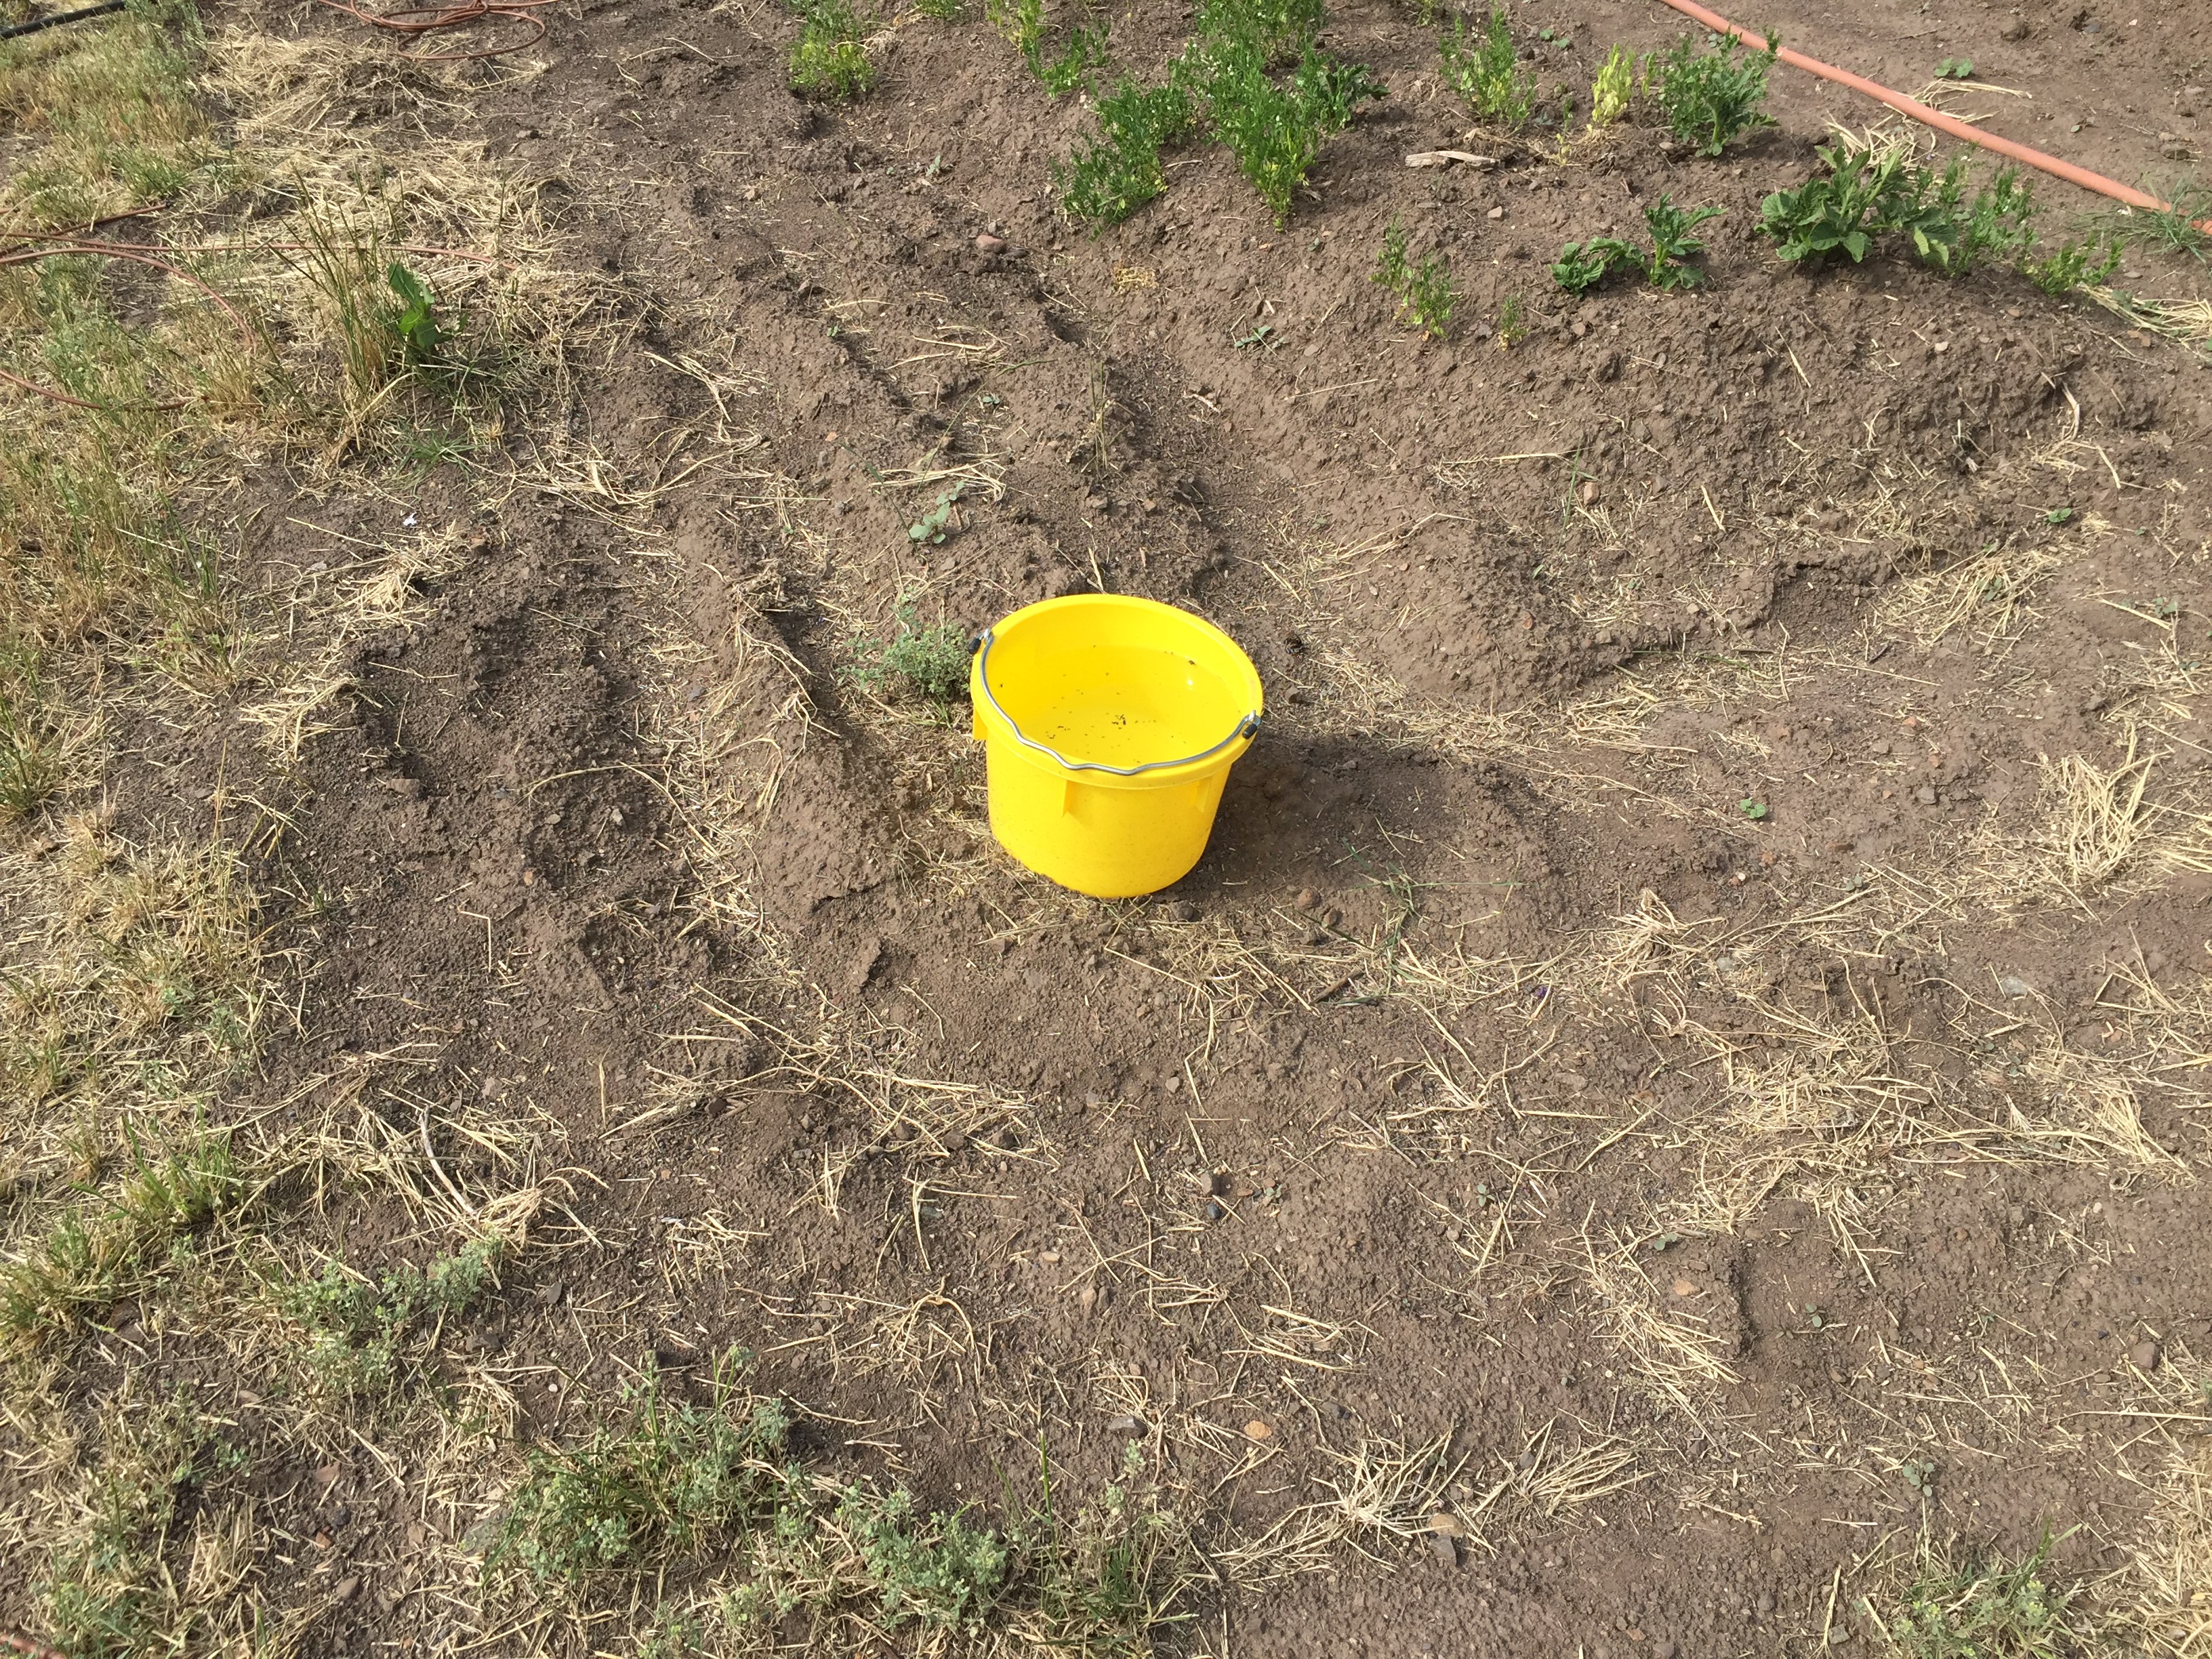
This fact makes it tempting to only partly fill the bucket, with perhaps 1 gallon at the bottom. This practice will severely reduce the number of aphids captured, since the aphids are unlikely to fly so far down into the bucket to contact the water. (See below for my opinion about how full a trap should be.) The vessel I used in college, which was a very handy design, was a 5-quart pail, about 9 inches in diameter. This pail was easy to manage in terms of water volume needed, plus avoiding drying out, ease of cleaning, etc. Finding a yellow one is the only trick! Pictured here is a 2-gallon pail purchased from my local True Value Hardware store. This pail comes in a few bright colors, presumably to make it harder to lose on your farm or ranch. I have used it now for two weeks of sampling and it is very effective.
- Water level. As noted above, water level in a yellow pan trap is crucial. In a perfect world, the water level would be just short of flush with the rim of the vessel at all times. In the real world, your goal is to consider heat, drying, irrigation, and rain to get as close to this ideal as possible. For example, in a place where summer rain is basically non-existent, and a trap will be checked once a week, a 2-gallon bucket would have to be filled to the rim each week. In fact, in very hot and dry weather, checking traps more than once a week may be the only way to gather decent data.
- What to put in the water. Two things are often added to the water in yellow pan traps. First, a drop or two of soap, such as dish washing liquid. This tends to weaken the surface tension of the water, theoretically making the water trappier. I conducted plenty of successful yellow trapping, however, without using soap. One advantage of not using soap is that the trapped aphids will float on the surface for quite some time, barring rain or irrigation, making them much easier to pick out with a brush (see below for advice on gathering the aphids from the trap). The disadvantages of not using soap are that the aphids can escape more easily (I’ve witnessed this happening — they can walk on water), and the water tension is really strong when you poke your alcohol-moistened brush into the water, which causes everything to scoot away from the alcohol-water interaction on the surface. Second, I used to use a small crystal of copper sulfate in each pail each week. This inhibits mold growth on your precious aphids as they wait for you to collect them from the water. That said, if you collect your aphids from the water every couple days, copper sulfate is not needed.
- Placing the trap. Back in my yellow trapping days I conducted an experiment over several weeks in which my yellow traps were placed on various backgrounds. I painted sheets of plywood different colors, like black, green, etc. and compared trap catches on those backgrounds to traps placed on bare ground. I gave the data to my boss, but alas, did not keep it for myself, so I don’t recall the results in detail (I think results from similar work have been published by others). One thing I do remember is that background type strongly affected trap catch. And, I recall that traps placed on bare ground worked very well. So, if using a pail or similar vessel, as I suggest, I strongly recommend placing the trap on bare ground or on a surface such as unpainted plywood (see the photo above — this trap is placed next to my garden plots on ground I till regularly). If the study is in agriculture, the trap should be placed either just outside the field, or on bare ground (or plywood) inside the field. Traps placed directly within foliage of the crop or surrounding vegetation are unlikely to be as effective.
- Maintenance. I’ve already talked about maintaining trap water level, and it cannot be overemphasized. Also crucial, and hopefully obvious, is that the yellow trap must be, well, yellow. For example, a yellow pail covered in dirt is no longer yellow from the perspective of an aphid.

Hence, at every maintenance interval, e.g. weekly, the trap must be thoroughly scrubbed outside and inside to make it as like-new as possible. Similarly, long-term exposure to sun will likely make your yellow become less yellow. At best, this makes the trap catches at different times less comparable, at worst it makes the trap ineffective. So, if using an inherently yellow thing, like a pail made of yellow plastic, change the pail at least annually. If using paint to make your color, probably painting annually is necessary. But, remember the goal is to maintain a bright yellow color regardless of effort it takes.
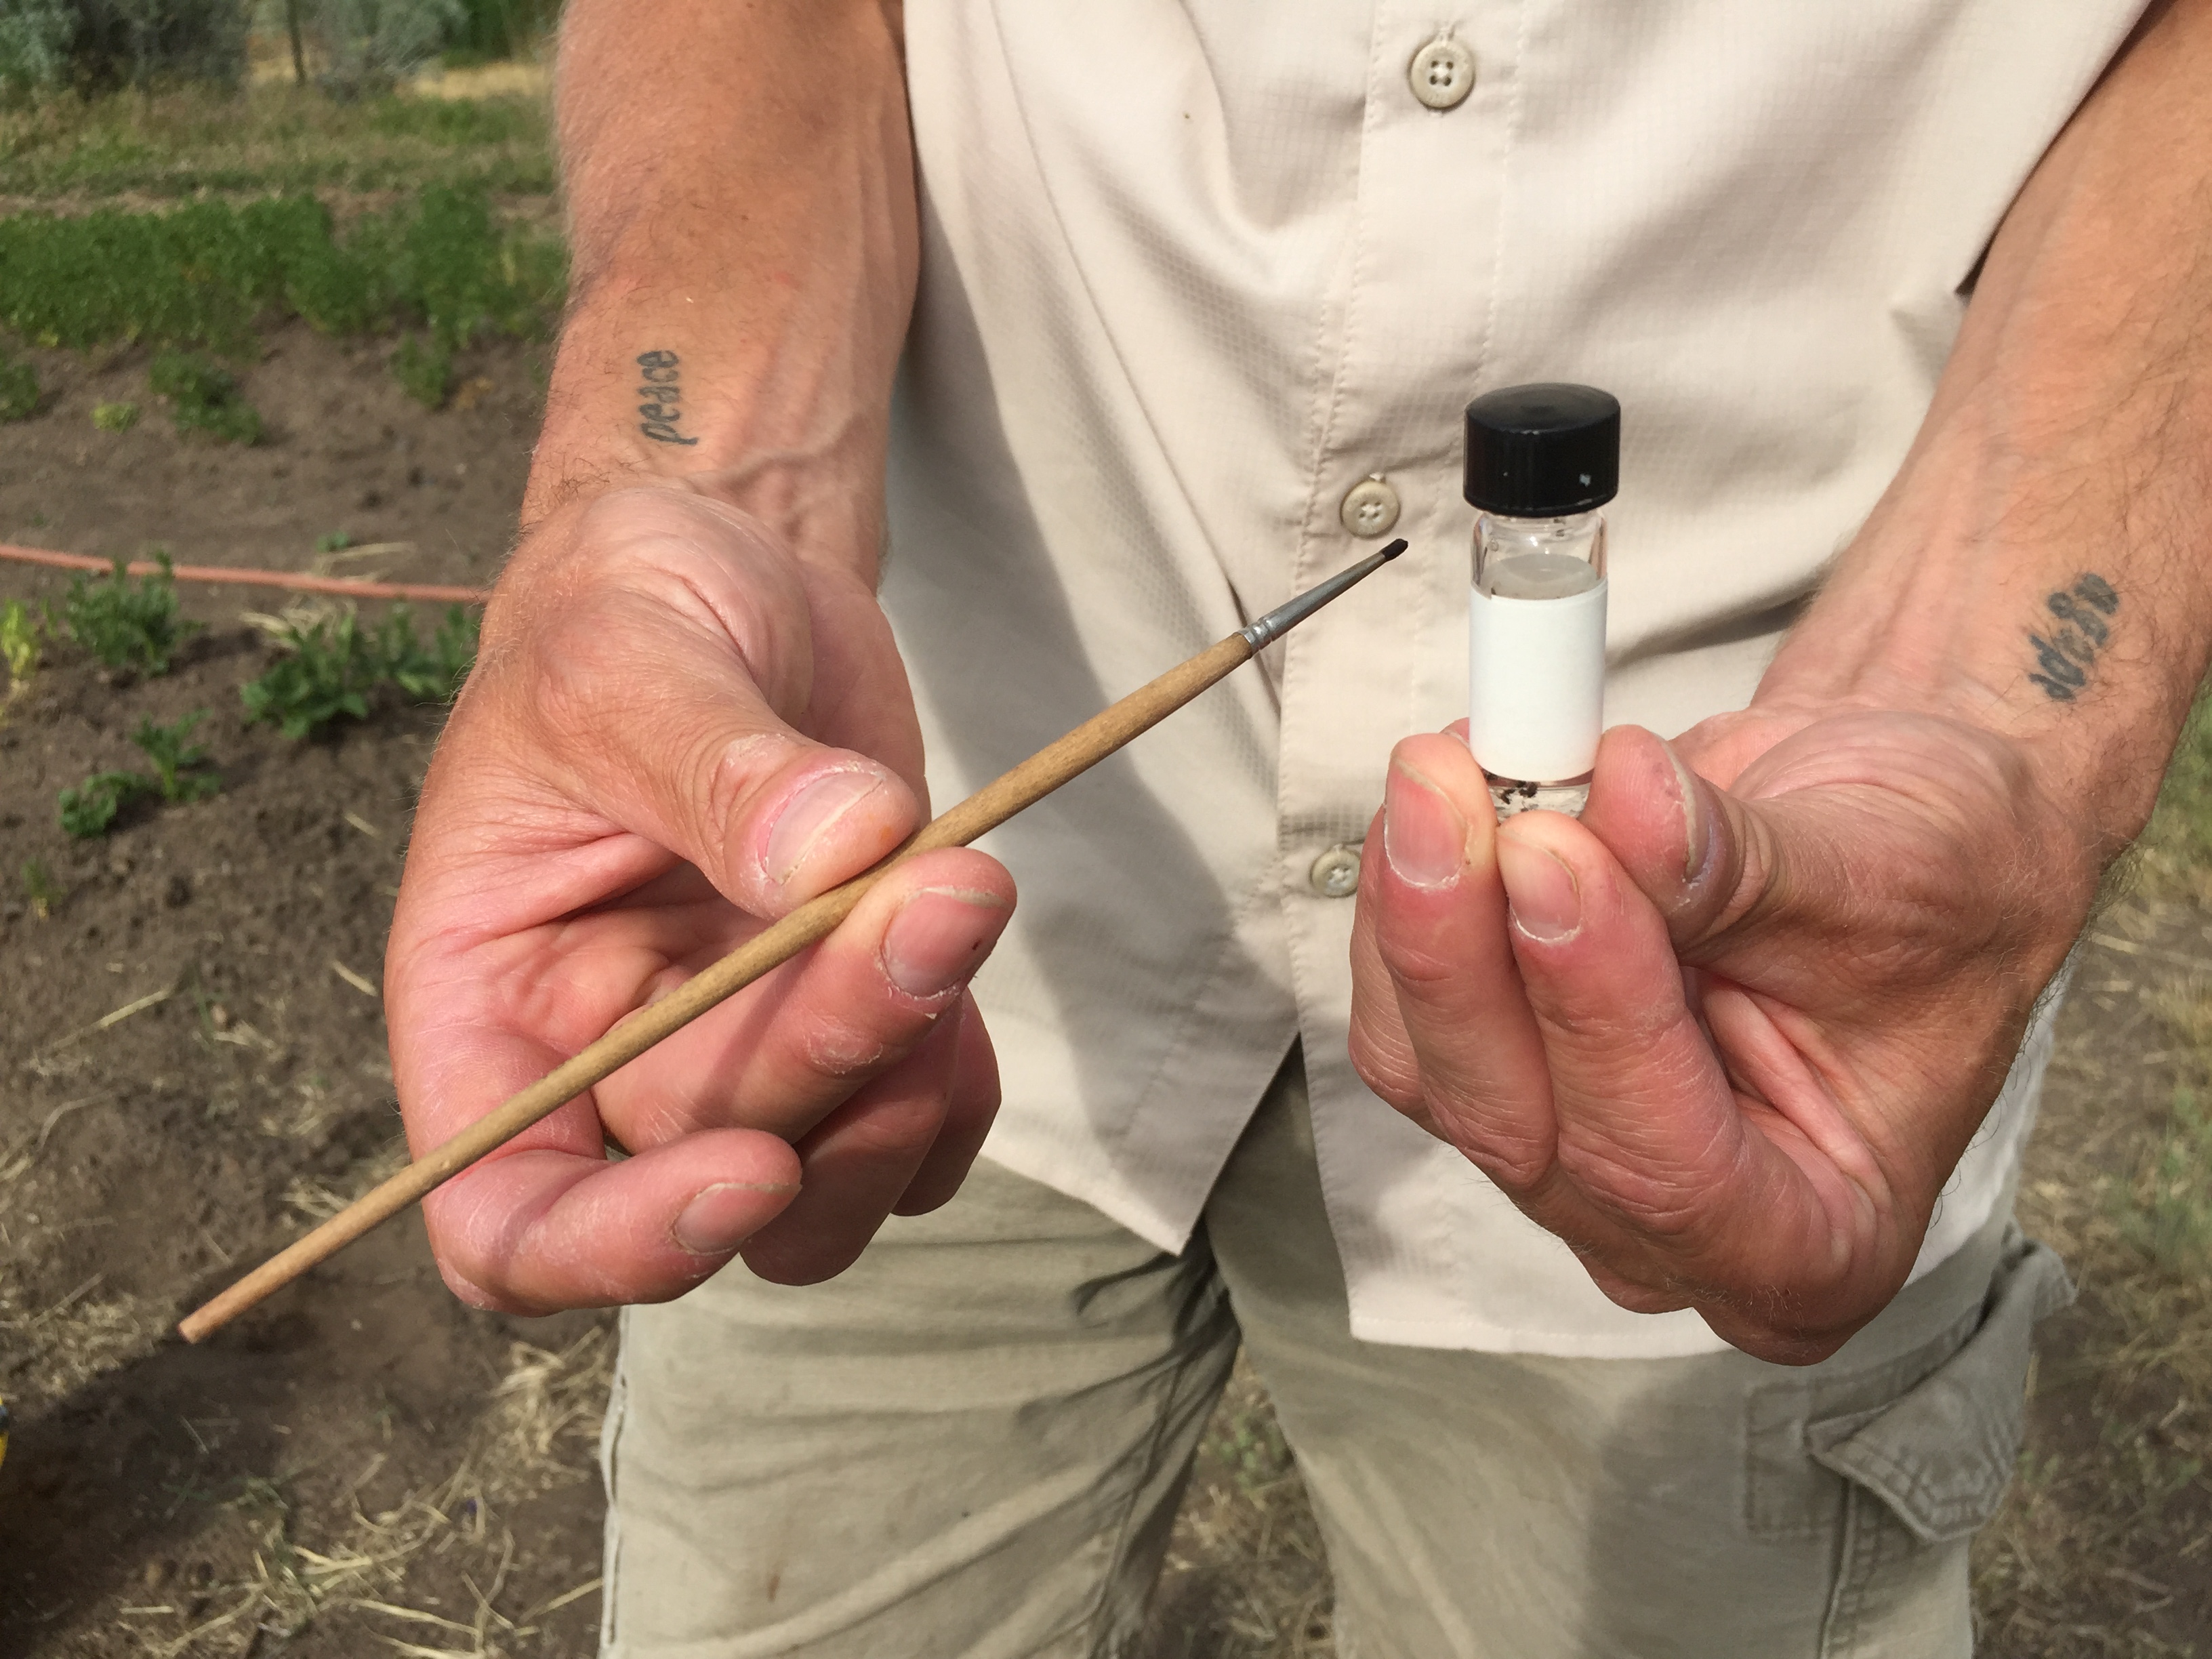
- Gathering the aphids. Not only have I done lots of yellow trapping, but as I recall it was the first task I did on my first day of work on the research farm in about 1987. I went out with the extension agent and helped him gather the aphids and maintain the traps on his 36-trap route. That was the day I learned the most elegant way to gather the aphids from a yellow trap. First, buy a handful of small paint brushes at an art supply store. By small, I mean brushes about 4 mm across.
And you’ll need a handful because inevitably you’ll lose them regularly. Then, with either young powerful eyes, or if you’re old like me, with strong reading glasses on, pick the aphids from the water surface with the brush, and place them directly into your sample vial (I recommend vials of about 4 ml with flat bottoms and good quality screw-on caps, filled mostly full with 70-80% ethanol).
Obviously, this requires the ability to recognize aphids from among the many insects in the water. It’s not as hard as it sounds – I trained talented teenagers to do it fairly quickly. Once all aphids on the surface are gathered, then start gently pouring the water out, being careful not to stir up the insects that have sunk to the bottom. Once most of the water is poured out, start poking through the submerged insects with your brush, gathering the aphids. This is also not as hard as it sounds, nor is it overly time-consuming. Many folks will gravitate toward some kind of sieving technique for gathering the insects from the trap. An example procedure I’ve heard is to take the whole pail of water and submerged insects and pour it through a sieve.

Then, gather all the insects into a large sample bottle. Then, carry that bottle back to the lab where a hapless student is assigned to sort the aphids from among all the other rotting insects, finally thereby creating a clean vial of aphids. Apart from the added steps, the sieving technique suffers another serious drawback: physical damage to the insects so processed. Correctly identifying aphids requires that they arrive at the aphidologist’s desk with their legs, antennae, wings, abdomens, and heads attached.